
axios学习
前置条件
已经学习过ajax、Promise
准备json-server包,快速搭建HTTP服务(用axios的时候需要向服务端发送请求即需要服务端这个角色来与axios结合做实践)
- json-server用于模拟服务端接口数据,可以根据json数据建立一个完整的web服务
- 1安装json-server
npm install -g json-server //查看版本号,安装成功 json-server -v - 2在文件夹下创建一个db.json文件,存放一些数据。
{ "posts": [ //文章 { "id": 1, "title": "json-server", "author": "typicode" }, { "id": 2, "title": "《b站大学》", "author": "吴老师" } ], "comments": [ //评论 { "id": 1, "body": "some comment", "postId": 1 }, { "body": "喜大普奔", "postId": 2, "id": 2 } ], "profile": { //个人信息 "name": "typicode" } } - 3 启动服务
进入终端。执行启动json-server命令:json-server --watch .\db.json
认识axios
axios 是什么?
axios是目前前端使用非常广泛的基于 promise 的 HTTP 网络请求库,包括Vue/React也是推荐使用axios;
本质是XMLHttpRequests请求 即ajax请求
axios 特性:
- 从浏览器中创建 XMLHttpRequests (浏览器中发送xml请求)
- 从 node.js 创建 http 请求 (在node.js中发送http请求)
- 支持 Promise API 相关操作
- 拦截请求和响应
- 转换请求数据和响应数据(对请求和响应的数据作转换)
- 取消请求
- 自动将结果转换成 JSON 数据
- 客户端支持防御 XSRF (阻止跨站攻击)
axios安装
- 1 使用 npm安装:
$ npm install axios - 2 使用 yarn安装:
$ yarn add axios - 3 使用 jsDelivr CDN安装:
<script src="https://cdn.bootcdn.net/ajax/libs/axios/0.26.1/axios.min.js"></script>
 console.log(axios);
 //ƒ() {for(var n=new Array(arguments.length),r=0;r<n.length;r++)n[r]=arguments[r];return e.apply(t,n)}

 //建议使用国内CDN网速较快
 //去这个网站引入 https://www.bootcdn.cn/axios/
axios的基本使用
前置:引入了axios
准备四个按钮发送不同的请求
<div class="container">
    <h2 class="page-header">基本使用</h2>
    <button class="btn btn-primary"> 发送GET请求 </button>
    <button class="btn btn-warning"> 发送POST请求 </button>
    <button class="btn btn-success"> 发送 PUT 请求 </button>
    <button class="btn btn-danger"> 发送 DELETE 请求 </button>
</div>
GET请求
//获取按钮
const btns = document.querySelectorAll('button');
//第一个 (get 查询功能)
btns[0].onclick = function () {
    //发送ajax请求
    axios({
        //请求类型
        method: 'GET',
        //请求地址 刚启动好的json-server地址 且id为2的那篇文章
        url: ' http://localhost:3000/posts/2'
    }).then(response => {
        console.log(response);
    })
}
POST请求
//添加一篇新的文章 (post 添加功能)
btns[1].onclick = function () {
    //发送ajax请求
    axios({
        method: 'POST',                       //请求类型
        url: ' http://localhost:3000/posts',  //请求地址
        data: {
            "title": "招聘摄影",               //请求体
            "author": "小吴"
        }
    }).then(response => {
        console.log(response);
    })
}
PUT请求
//更新文章 需要在url里加上id 比如这里要更新的是id为3的文章(put 更新功能)
btns[2].onclick = function () {
    //发送ajax请求
    axios({
        method: 'PUT',                          //请求类型
        url: ' http://localhost:3000/posts/3',  //请求地址
        data: {
            "title": "招聘程序员吗",             //修改请求体的数据
            "author": "小瑶酱"
        }
    }).then(response => {
        console.log(response);
    })
}
DELETE请求
//删除文章 (delete 删除功能)
btns[3].onclick = function () {
    //发送ajax请求
    axios({
        //请求类型
        method: 'DELETE',
        //请求地址
        url: ' http://localhost:3000/posts/3',
    }).then(response => {
        console.log(response);
    })
}
axios的其他发送请求
使用request方法 发送 GET 请求 (接收一个对象类型参数)
//获取按钮
const btns = document.querySelectorAll('button');
btns[0].onclick = function(){
    // axios()
    axios.request({
        method:'GET',
        url:'  http://localhost:3000/posts',
    // 返回结果依然是Promise对象 用then指定成功的回调
    }).then((response) => {
        console.log(response);
    })
    ;
}
//使用POST方法 发送post请求 增加数据
//获取按钮
const btns = document.querySelectorAll('button');
        btns[1].onclick = function(){
            // axios()
            axios.post(
                'http://localhost:3000/comments',
                {
                    "body": "喜大普奔",
                    "postId": 2
                }).then(response => {
                    console.log(response);
                })
        }
axios配置对象
{
   // `url` 是用于请求的服务器 URL
  url: '/user',

  // `method` 是创建请求时使用的方法
  method: 'get',

  // `baseURL` 将自动加在 `url` 前面,除非 `url` 是一个绝对 URL。
  baseURL: 'https://some-domain.com/api/',

  // `transformRequest` 对请求的数据做处理,处理后将结果像服务器发送
  // 只能用在 'PUT', 'POST' 和 'PATCH' 这几个请求方法
  // 后面数组中的函数必须返回一个字符串,或 ArrayBuffer,或 Stream
  transformRequest: [function (data, headers) {
    // 对 data 进行任意转换处理
    return data;
  }],

  // `transformResponse` 对响应的结果做一些改变,改变之后我们用自定义的回调去处理结果
  transformResponse: [function (data) {
    // 对 data 进行任意转换处理
    return data;
  }],

  // `headers` 对请求头信息做一个配置(身份校验)
  headers: {'X-Requested-With': 'XMLHttpRequest'},

  // `params` 是即将与请求一起发送的 URL 参数
  // 必须是一个无格式对象(plain object)或 URLSearchParams 对象
  params: {
    ID: 12345
  },

  // `data` 是作为请求体的设置
  // 只适用于这些请求方法 'PUT', 'POST', 和 'PATCH'
  // 在没有设置 `transformRequest` 时,必须是以下类型之一:
  // - string, plain object, ArrayBuffer, ArrayBufferView, URLSearchParams
  // - 浏览器专属:FormData, File, Blob
  // - Node 专属: Stream
  data: {
    firstName: 'Fred'
  },

  // `timeout` 指定请求超时的毫秒数(0 表示无超时时间)
  // 如果请求话费了超过 `timeout` 的时间,请求将被中断
  timeout: 1000,

  // `withCredentials` 表示跨域请求时对coken的携带设置
  withCredentials: false,  //不携带

  // `adapter` 对请求的适配器做设置
  // 有两种一种是ajax、一种是node.js里发送http请求的
  adapter: function (config) {
    /* ... */
  },

  // `auth` 对请求基础的验证设置用户名和密码
  auth: {
    username: 'janedoe',
    password: 's00pers3cret'
  },

  // `responseType` 表示服务器响应的数据类型,可以是 'arraybuffer', 'blob', 'document', 'json', 'text', 'stream'
  responseType: 'json', // 默认

  // 响应结果的编码
  responseEncoding: 'utf8',

  // `xsrfCookieName` 跨域请求标识对cookie的名称设置
  xsrfCookieName: 'XSRF-TOKEN',

  // `xsrfHeaderName`  是承载 xsrf token 的值的 HTTP 头的名称
  xsrfHeaderName: 'X-XSRF-TOKEN', // default

  // `onUploadProgress` 上传的一些回调
  onUploadProgress: function (progressEvent) {
    // 对原生进度事件的处理
  },

  // `onDownloadProgress` 下载时的一些回调
  onDownloadProgress: function (progressEvent) {
    // 对原生进度事件的处理
  },

  // `maxContentLength` 定义允许的响应内容的最大尺寸
  maxContentLength: 2000,

  // `validateStatus`  对响应结果的成功做一个设置 什么情况下是成功的呢?默认值为响应状态码 大于等于200 小于300
  validateStatus: function (status) {
    return status >= 200 && status < 300; // default
  },

  // `maxRedirects` 最大跳转的次数 默认5次 即向一个服务发送请求,它作了跳转后呢,我们是否需要让它继续往前进行请求
  maxRedirects: 5, // 默认的

  // 设置socket 文件的位置 作用是像docker的守护进程发送请求的
  socketPath: null, // default

  // 对客户端的一些信息做一些设置
  httpAgent: new http.Agent({ keepAlive: true }),
  httpsAgent: new https.Agent({ keepAlive: true }),

  // 设置代理
  // `auth` 表示 HTTP 基础验证应当用于连接代理,并提供凭据
  // 这将会设置一个 `Proxy-Authorization` 头,覆写掉已有的通过使用 `header` 设置的自定义 `Proxy-Authorization` 头。
   proxy: {
    host: '127.0.0.1',
    port: 9000,
    auth: {
      username: 'mikeymike',
      password: 'rapunz3l'
    }
  },

  // `cancelToken` 对ajax请求作一个取消的设置
  cancelToken: new CancelToken(function (cancel) {

  })

}
axios的默认配置
例子:点击按钮发送get请求
//没有做默认配置时,每次访问都比较麻烦
<div class="container">
    <h2 class="page-header">基本使用</h2>
    <button class="btn btn-primary"> 发送GET请求 </button>
    <button class="btn btn-warning"> 发送POST请求 </button>
    <button class="btn btn-success"> 发送 PUT 请求 </button>
    <button class="btn btn-danger"> 发送 DELETE 请求 </button>
</div>
<script>
    // 获取按钮
    const btns = document.querySelectorAll('button');
    btns[0].onclick = function(){
        axios({
            method:'GET',
            url: 'http://localhost:3000/posts'
        }).then(response => {
            console.log(response);
        })
    }
</script>
使用默认配置后
//默认配置
axios.defaults.method = 'GET';  //设置默认的请求类型为 GET
axios.defaults.baseURL = 'http://localhost:3000' //设置基础url
btns[0].onclick = function () {
    axios({
        url: '/posts',
    }).then(response => {
        console.log(response);
    })

//还有其他的默认配置项
// axios.defaults.params = {id:100}; 默认的请求url参数 即url后增加 ?id=100
// axios.defaults.timeout = 3000;  超时时间
axios创建实例对象
主要用于:项目中接口数据服务不是来自于单一的服务器,比如有两个服务器A、B,都提供了数据服务。在发送请求时,比如给A发,就要去设置A的协议域名端口,如果用默认方法做只能满足一个服务器,
<div class="container">
    <h2 class="page-header">基本使用</h2>
    <button class="btn btn-primary"> 发送GET请求 </button>
    <button class="btn btn-warning" > 发送POST请求 </button>
    <br>
</div>
<script>
    //获取按钮
    const btns = document.querySelectorAll('button');
    //创建实例对象 /getJoke
    const duanzi = axios.create({
        baseURL:'https://api.apiopen.top',
        timeout:2000
    });
    //这里duanzi 与 axios 对象的功能几近是一样的
    duanzi({
        url:'/getJoke',
    }).then((response)=>{
        console.log(response);
    })

    duanzi.get('/getJoke').then((response) => {
        console.log(response.data);
    })

    const another = axios.create({
        baseURL:'http:b.com',
        timeout:2000
    })
axios拦截器
在请求或响应被 then 或 catch 处理前拦截它们。
在发送请求之前,借助一些函数对请求的参数和内容作一些处理和检测。如果说都没有问题再去发送请求,有问题的话这个请求就停止或者取消。
当服务器返回结果之后,可以通过自己指定的回调处理结果。那么响应拦截器可以在我们处理响应结果之前先对结果做一些预处理。如:失败了就对失败结果做一些提醒或者记录,还能对数据接口做一些格式化的处理。然后再交由我们自己自定义的回调来处理。如果有问题在响应拦截器中就处理掉了。
执行顺序是,当用户发送请求后先执行请求拦截器成功/失败的回调,然后走响应拦截器成功/失败的回调,然后再走自定义的成功/失败的回调
一般情况
// Promise相关
// 设置请求拦截器  config 配置对象
axios.interceptors.request.use(function (config) {
    console.log('请求拦截器 成功');
    return config;
}, function (error) {
    console.log('请求拦截器 失败 ');
    return Promise.reject(error);
});

// 设置响应拦截器
axios.interceptors.response.use(function (response) {
    console.log('响应拦截器 成功');
    return response;
    // return response;
}, function (error) {
    console.log('响应拦截器 失败')
    return Promise.reject(error);
});

//发送请求
axios({
    method: 'GET',
    url: 'http://localhost:3000/posts'
}).then(response => {
    console.log('自定义回调处理成功的结果');
    console.log(response);
});
其他情况:请求拦截器成功但抛出错误,响应拦截器失败,自定义失败回调
// Promise相关
// 设置请求拦截器  config 配置对象
axios.interceptors.request.use(function (config) {
    console.log('请求拦截器 成功');
    // return config;
    throw '参数出了问题'
    //如果这里抛出错误即失败了,返回一个失败的Promise,
    //在执行后续的响应回调时就只能走失败的回调了,
}, function (error) {
    console.log('请求拦截器 失败 ');
    return Promise.reject(error);
});

// 设置响应拦截器
axios.interceptors.response.use(function (response) {
    console.log('响应拦截器 成功');
    return response;
    // return response;
}, function (error) {
    console.log('响应拦截器 失败')
    return Promise.reject(error);
});

//发送请求
axios({
    method: 'GET',
    url: 'http://localhost:3000/posts'
}).then(response => {
    console.log('自定义回调处理成功的结果');
    console.log(response);
}).catch(reason => {
    console.log('自定义回调处理失败的结果');
    console.log(reason);
})
多个请求、响应的结果顺序
请求拦截器 成功 2号
请求拦截器 成功 1号
响应拦截器 成功 1号
响应拦截器 成功 2号
自定义回调处理成功的结果
{data: Array(2), status: 200, statusText: ‘OK’, headers: {…}, config: {…}, …}
// Promise相关
// 设置请求拦截器  config 配置对象
axios.interceptors.request.use(function (config) {
    console.log('请求拦截器 成功 1号');
    //修改 config 中的参数
    // config.params = {a:100};
    return config;
}, function (error) {
    console.log('请求拦截器 失败 1号');
    return Promise.reject(error);
});

axios.interceptors.request.use(function (config) {
    console.log('请求拦截器 成功 2号');
    //修改 config 中的参数
    config.timeout = 2000;
    return config;
}, function (error) {
    console.log('请求拦截器 失败 2号');
    return Promise.reject(error);
});

// 设置响应拦截器
axios.interceptors.response.use(function (response) {
    console.log('响应拦截器 成功 1号');
    return response;
    // return response;
}, function (error) {
    console.log('响应拦截器 失败 1号')
    return Promise.reject(error);
});

axios.interceptors.response.use(function (response) {
    console.log('响应拦截器 成功 2号')
    return response;
}, function (error) {
    console.log('响应拦截器 失败 2号')
    return Promise.reject(error);
});

//发送请求
axios({
    method: 'GET',
    url: 'http://localhost:3000/posts'
}).then(response => {
    console.log('自定义回调处理成功的结果');
    console.log(response);
}).catch(reason => {
    console.log('自定义回调处理失败的结果');
    console.log(reason);
})
axios取消请求
基本流程
配置 cancelToken 对象
缓存用于取消请求的 cancel 函数
在后面特定时机调用 cancel 函数取消请求
在错误回调中判断如果 error 是 cancel, 做相应处理实现功能
点击按钮, 取消某个正在请求中的请求在请求一个接口前, 取消前面一个未完成的请求
使用 canceltoken 取消请求
Axios 的 cancel token API 基于cancelable promises proposal
可以使用 CancelToken.source 工厂方法创建 cancel token,像这样:
<div class="container">
    <h2 class="page-header">axios取消请求</h2>
    <button class="btn btn-primary"> 发送请求 </button>
    <button class="btn btn-warning" > 取消请求 </button>
</div>
<script>
    //获取按钮
    const btns = document.querySelectorAll('button');
    //2.声明全局变量
    let cancel = null;
    //发送请求
    btns[0].onclick = function(){
        // 防止用户疯狂点击按钮发送请求
        //检测上一次的请求是否已经完成
        if(cancel !== null){
            //取消上一次的请求
            cancel();
        }
        axios({
            method: 'GET',
            url: 'http://localhost:3000/posts',
            //1. 添加配置对象的属性
            cancelToken: new axios.CancelToken(function(c){
                //3. 将 c 的值赋值给 cancel
                cancel = c;
            })
        }).then(response => {
            console.log(response);
            //将 cancel 的值初始化
            cancel = null;
        })
    }

    //绑定第二个事件取消请求
    btns[1].onclick = function(){
        cancel();
    }
axios源码文件结构说明
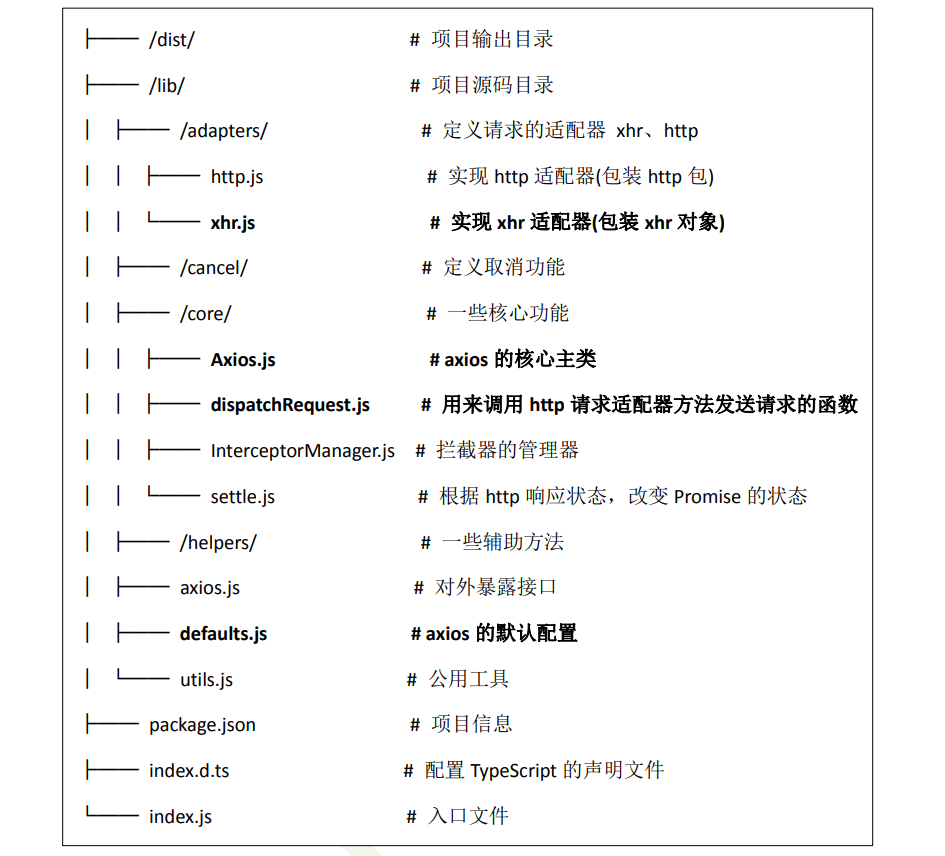
├──  /dist/       # 项目打包后的文件即最终输出的axios整体文件
├── /lib/         # 项目源码目录
│     ├── /adapters/    # 定义请求的适配器 xhr、http
│     │     ├── http.js                 # 用来在node.js中向   远端服务发送HTTP请求的
│     │     └── xhr.js                  # 实现 xhr 适配器(包装 xhr 对象)
│     ├── /cancel/      # 定义取消功能
│     ├── /core/        # 一些核心功能
│     │     ├── Axios.js                # axios 的核心主类 构造函数
│     │     ├── dispatchRequest.js      # 用来调用 http 请求适配器方法发送请求的函数
│     │     ├── InterceptorManager.js   # 拦截器的管理器
│     │     └── settle.js               # 根据 http 响应状态,改变 Promise 的状态
│     ├── /helpers/     # 一些辅助方法
│     ├── axios.js      # 对外暴露接口
│     ├── defaults.js   # axios 的默认配置
│     └── utils.js      # 公用工具
├── package.json  # 项目信息
├── index.d.ts    # 配置 TypeScript 的声明文件
└── index.js      # 入口文件
axios的创建过程
axios对象创建过程模拟实现
axios发送请求过程详解
模拟实现axios发送请求
axios拦截器工作原理
模拟实现axios拦截器功能
axios 取消请求工作原理
模拟实现axios取消请求功能
axios源码分析总结
 微信
微信- 支付宝